
Transfer an Invoice from One Customer Account to Another
The Transfer an Invoice screen grants the user the ability to transfer an Accounts Receivable invoice from one customer’s account to another customer’s account.
Once an invoice transfer is completed, both customer accounts will show a balance change resulting from the transfer. Furthermore, if the option toggle in the lower right-hand corner has the “Yes” option clicked, any reprints of the transferred invoice will reflect the new customer’s address and account number.
This Quick Step Guide will cover the basic amount of information needed to help you accomplish your task, broken down into simple steps.
For more details, review the Step Reference Guide; you’ll find the same step sequence as found in the Quick Step Guide that includes detailed explanations about the functions of each field and the options available to you.
To help you clearly follow this step-by-step guidance, the two customers used for the transfer invoice process will be referred to as Customer A and Customer B:
Customer A is the account that we’ll transfer an invoice FROM.
Customer B is the account we’ll transfer an invoice TO.
Starting on the Transfer an Invoice screen…
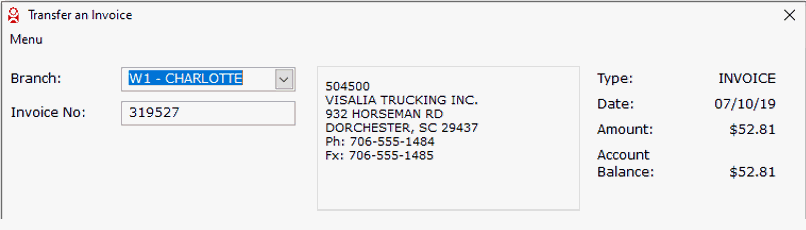
Use the “Branch” drop-down to select the company branch associated with the invoice you want to transfer.
Enter the “Invoice Number” and press enter. Customer A’s account information will load into the right-side area of the screen.
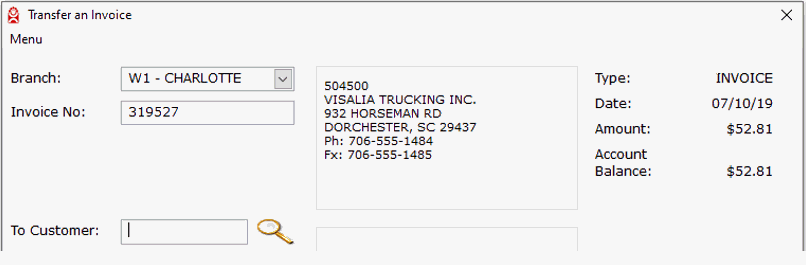
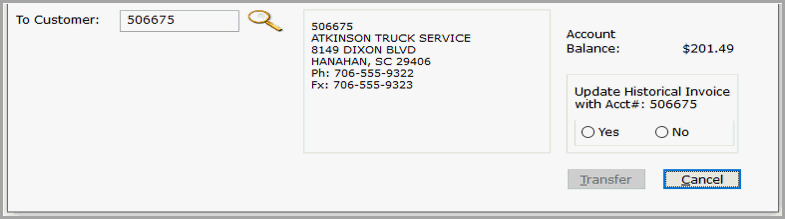
In the “To Customer” field, enter Customer B’s account number OR used the customer lookup to find Customer B. Customer B’s account information will load into the right-side area of the screen.
At this point, your screen should look similar to this screen shot:
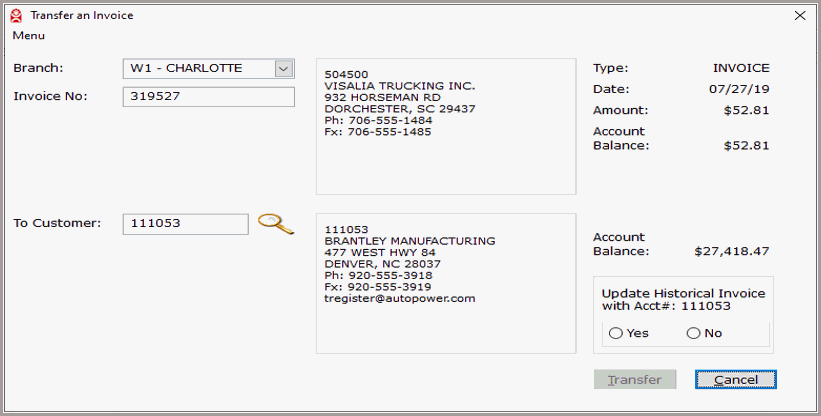
The lower right corner will display the Update Historical Invoice with Acct# toggle option. Select “Yes” to have the new customer account number (Customer B) print on all future reprints of the invoice. Select “No” to leave the old customer account (Customer A) on invoice reprints.
Selecting “Yes” or “No” lights up the Transfer button:
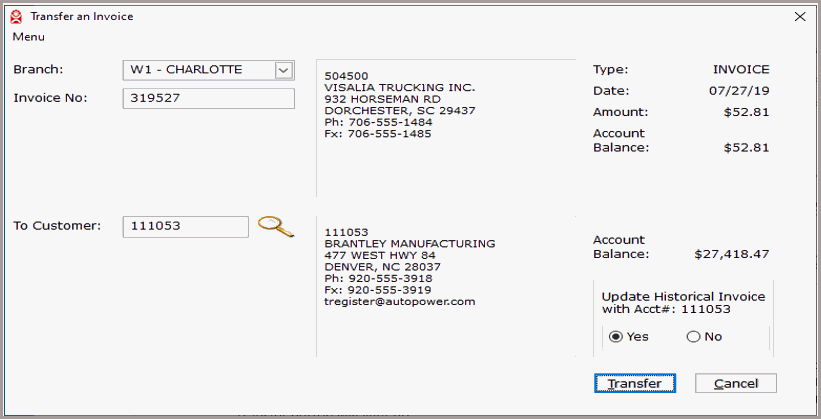
Once you’ve verified that all your selections are correct, click the Transfer button. The invoice transfer will process and you’ll see and confirmation message window. Click OK to close window.
This is the last step.
Enter the branch ID associated with the invoice or click the drop-down arrow and select the ID from the list.

Enter the invoice number to be transferred. When a user enters a valid invoice number, the customer account number, company name, address, phone, fax, and email associated with that invoice will display on the right side of the screen. The type of invoice being transferred, invoice date, invoice amount, and the customer’s current balance is also displayed.
Enter the customer account number of the account receiving the invoice, or click the search icon to Lookup the customer. The Customer Lookup window will display.
If you do not know the customer’s account number, the Customer Lookup allows you to search for a customer based on Name, Account#, State, Zip code, Area code, or Address. Select the criteria option for your search, and make an entry to begin your search.

As you type, the search results will display potential matches. Once identified, click on the row of the customer you want to select.
When a customer account number is selected the Customer Lookup window will close and account number, company name, address, phone, fax, and email associated with that customer account number are displayed on the right side of the screen. The receiving customer’s current account balance is also displayed.
Once the customer account has been entered, the “Update Historical Invoice with Acct#” option toggle appears in the lower right corner.
Select “Yes” to have the new customer account number appear on invoice reprints.
Select “No” to keep the old customer account number on invoice reprints.
Once a valid invoice number and customer number has been entered and the toggle option has been selected, the “Transfer” button becomes active.

Clicking the Cancel button closes the Transfer an Invoice screen, returning the user to the Menu.
Clicking the Transfer button processes the invoice transfer. When the process is complete a window will display, confirming which invoice was transferred and which customer account received the transferred invoice.
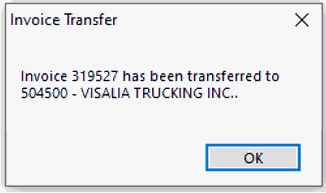
Click OK to close the window. This is the last step.
![]()
AutoPower Release Notes ● AutoPower U Help Directory ● Customer Support Portal
© AutoPower Corporation. All Rights Reserved.
Copyright Notice
AutoPower Corporation makes no warranty of any kind with regard to this material, including, but not limited to, the implied warranties of merchantability and fitness for a particular purpose. AutoPower Corporation shall not be liable for errors contained here in or for incidental or consequential damages in connection with the furnishing, performance, or use of this material. The software described in this document is furnished under a license agreement and nondisclosure agreement. The software may be used or copied only in accordance with the terms of these agreements.
This document contains proprietary information, which is protected by copyright laws. All rights are reserved. No part of this document may be copied, reproduced, transmitted, or translated into another language in any form or by any means, electronic or mechanical, for any purpose, without the express written permission of AutoPower Corporation. The information contained in this document is subject to change without prior notice. Companies, names, and data used in examples herein are fictitious unless otherwise noted.