No AIN Member is obligated to become a trading partner with any other AIN Member. Partnerships are established based on a series of actions you control:
· Sending Invitations
· Receiving and Accepting Invitations
· Denying Invitations
Forming AIN partnerships enables your ability to expand part searches to include partner inventories.
The following steps review:
· Viewing Potential AIN Partners.
· Viewing the Status of Partner Invitations.
· Initiating actions to and from other AIN Members.
On the “Utility Programs Menu”, select the option "AIN Control Menu".
The “AIN Control Panel” screen will display. You will see the “My Profile” components. Click the “AIN Partners” button on the right side of the screen to display AIN Members.

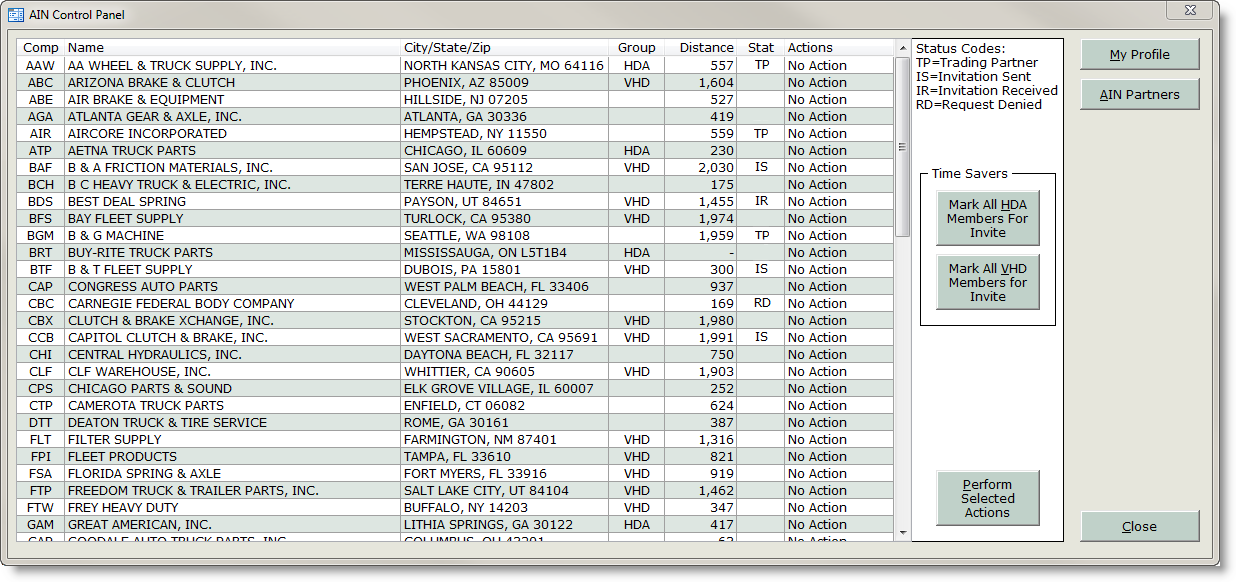
The AIN Member grid displays the following columns:
COMP: The three letter acronym representing the company in the AIN.
NAME: The full company name of the AIN Member.
CITY/STATE/ZIP: The city, state, and zip code of the company.
GROUP: Indicates buying group affiliation.
(Blank) – No buying group affiliation.
HDA – HDA Truck Pride
VHD – Vipar Heavy Duty
Distance: Indicates the distance (in miles) from your profile location to another AIN Member company location.
Stat: Will indicate your partner status code with other AIN Members.
(BLANK) – Not a partner/No invitation activity.
TP – Trading Partner
IS – Invitation Sent
IR – Invitation Received
RD – Request Denied
Actions: This column has a drop-down selection for each AIN Member
that allows you to choose an action to manage AIN Partners.
The selections in the “Actions” drop-down will allow you to manage your partnership with other AIN Members.
This is the default selection. There will be no action processed in Step 3.
In the row of a member, use the “Actions” dropdown to select the option “Send Invite” if you wish to partner with this AIN Member. This process can be repeated multiple times for each member that you wish to send an invitation to.
The Time Saver buttons, “Mark all HDA Members for Invite” or “Mark all VHD Members for Invite”, allow you to quickly mark these buying group affiliated AIN Members to receive an invitation.
Accept Invite
When an invitation is received from another AIN Member, you will see a status “IR” (Invitation Received) in the “Stat” column.
In a member row with an “IR” status, use the dropdown in the “Actions” column and select “Accept Invite”. This action will be processed to the AIN Member in Step 3.
Deny Request
To deny an invitation, in a member row with an “IR” status use the dropdown in the “Actions” column and select “Deny Request”. This action will be processed to the AIN Member in Step 3.
When you are ready to process the actions established in Step 2, click the “Perform Selected Actions” button.

If you selected to “Send Invite”, The AIN Partner invitations will be delivered via email or AutoMail. The status for each selected member will change to “IS” (Invitation Sent) in the “Stat” column.
When an AIN Member accepts your invitation, the member’s status code will change to “TP” (Trading Partner) in the “Stat” column. Their inventory will now be a resource when using the AIN Part Search, and vise-versa.
When an AIN Member declines an invitation, the status will change to “RD” (Request Denied) in the “Stat” column.
If you selected to “Accept Invite”, the member will be notified that their invitation was accepted and the member’s status code will change to “TP” (Trading Partner) in the “Stat” column.
If you selected to “Deny Request”, the member will notified that their
invitation was denied and the member’s status code will change to “RD”
(Request Denied) in the “Stat” column.
To close the “AIN Control Panel” screen, click the “Close” button in the lower right of the screen. Alternatively, click the X button in the top right of the screen.
![]() © 2020 AutoPower
Corporation. All Rights Reserved.
© 2020 AutoPower
Corporation. All Rights Reserved.
Copyright Notice
AutoPower Corporation makes no warranty of any kind with regard to this material, including, but not limited to, the implied warranties of merchantability and fitness for a particular purpose. AutoPower Corporation shall not be liable for errors contained here in or for incidental or consequential damages in connection with the furnishing, performance, or use of this material. The software described in this document is furnished under a license agreement and nondisclosure agreement. The software may be used or copied only in accordance with the terms of these agreements.
This document contains proprietary information, which is protected by copyright laws. All rights are reserved. No part of this document may be copied,reproduced, transmitted, or translated into another language in any form or by any means, electronic or mechanical, for any purpose, without the express written permission of AutoPower Corporation. The information contained in this document is subject to change without prior notice. Companies, names, and data used in examples herein are fictitious unless otherwise noted.